• Home
    • Air Tightness
    • Thermal Supports
    • Ventilation Advice
    • Our Story
    • Our Blog
      • Air Tightness at floor level
      • Air Tightness for windows & doors
      • Thermal Brackets for windows & doors
      • Air Tightness for roofs & ceilings
      • General air tightness topics
      • Ventilation Advice
      • Air Tightness Training & Consultation
      • Air Tightness Products
    • Contact
    • ONLINE SHOP
  • Home
  • Air Tightness
  • Thermal Supports
  • Ventilation Advice
  • Our Story
  • Our Blog
    • Air Tightness at floor level
    • Air Tightness for windows & doors
    • Thermal Brackets for windows & doors
    • Air Tightness for roofs & ceilings
    • General air tightness topics
    • Ventilation Advice
    • Air Tightness Training & Consultation
    • Air Tightness Products
  • Contact
  • ONLINE SHOP
    Air Tightness for windows & doors  ·  20. February 2019

    Preparation is the key when it comes to functional air tightness

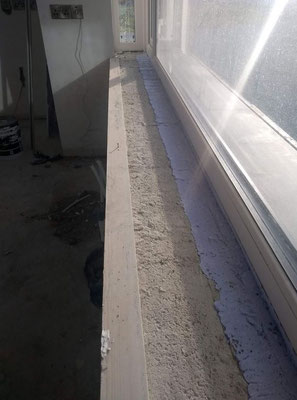
    I´d say the detail on the photo is a very common sample of what happens to some parts of the building during the construction stage. Every involved trade adds a certain amount of dirt and mess, which ends in the layout as seen on the photo. Could you imagine how the window tape would look in case of being installed already?


    There are two options now, to get the detail sorted:


    No 1 - install the window board or worktop and everything is covered

    No 2 - preparation and creating the functional air tightness layer


    If you have seriously considered option no 1 as an alternative, you might should go back to the start and do some learning about the principles of building sealing and air tightness in particular.


    The only solution that works in reality is, to clean the area, prepare the area and seal the area properly!


    Please find some more details about the different stages down below

    is-100

    PICHLER® ElastoCell air tight foam, 750ml


    Online Shop

     All dirt and mortar was removed to create a smooth surface. The gap between the cavity closer and the window frame has been sealed with PICHLER® air tight foam
     Because of the lowered cavity wall closer, the void was filled with PICHLER®air tight foam to level the surface.
     Finally the surface was primed with Spray Primer and the "Belgafoil SA-L In" window tape has been applied as air tight layer
    tagPlaceholderTags: Air Tightness for windows & doors

    Write a comment

    Comments: 0
    draggable-logo

    contact


    prodomo Ireland

    Unit 9 - Ridgeview

    Monavalley Business Park

    Tralee

    Co. Kerry

    V92 W2TH


    communication

    phone +353 (0)66 4014045

    mail: hello@prodomo.ie


    SHOP ONLINE

    Privacy Policy | Sitemap
    Copyright by prodomo Ireland. You may not use our name or logos or trademarks or any other content on any website of yours or that of any other person. Download or copy of content is for your own personal use only. Any kind of reproduction or other distribution requires the written consent of us.
    Log out | Edit
    • Scroll to top